Embed app setup
Turn on embedding in the Partner Dashboard
By default, all new apps are not embed in the Haravan admin. You can embed an existing app with the following steps:
- From your Partner Dashboard, click menu App.
- Click the name of your app.
- Click menu Commerce.
- In the Embedded app section, click Enable.
If you enable this feature for an existing app that isn't designed to use Haravan App-sdk, then users will no longer be able to use the app.
Serve your app over HTTPS
You must serve your embedded applications over HTTPS.
The Haravan admin uses HTTPS for all pages. Failure to serve an embedded app over HTTPS will cause errors in web browsers, due to mixed content restrictions.
To simplify local development, use http://localhost
Set the frame-ancestors directive (recommendations)
The Content Security Policy frame-ancestors directive controls where the app can be framed. You must ensure your app is only frameable by the authenticated shop domain to avoid clickjacking attacks.
For example, if the shop example-dev.myharavan.com installs your app, then the response headers from your app when being rendered by this shop will contain the following frame-ancestors declaration:
Content-Security-Policy: frame-ancestors https://example-dev.myharavan.com;
or
Content-Security-Policy: frame-ancestors https://*.myharavan.com;
You can include other declarations in your Content-Security-Policy header besides frame-ancestors.
The frame-ancestors directive replaces the obsolete X-Frame-Options response header.
Authorize installation
Follow this guide to ensure that your server implements installation app.
Redirect to the embedded app URL
At the end of the installation process, your app might redirect to the embedded app URL. This would cause the app to load twice: once outside the iframe, and then again inside the iframe.
For example, if the shop example-dev.myharavan.com installs your app, then your app build the embedded app URL like this:
https://example-dev.myharavan.com/admin/apps/YOUR_APP_CLIENT_ID
After you build the URL, you can perform a 3xx redirect to it.
Haravan amdin will open your app in an iframe with parameters:
shop- The domain of the specific shop that's embedding your app.orgid- The id of the specific shop that's embedding your app.locale- The current locale of the specific shop that's embedding your app.
Set up Haravan App SDK in your app
Haravan App SDK is available as a JavaScript module on npm, and you can install it in your app using npm or yarn. Alternatively, you can include Haravan App SDK on a page with a <script> tag pointing to a CDN-hosted copy of the library.
- npm
- yarn
- CDN-hosted
npm install --save @haravan/app-sdk
yarn add @haravan/app-sdk
<script src="https://unpkg.com/@haravan/app-sdk@1"></script>
<script>
  var AppSDK = window['app-sdk'];
</script>
Make sure that you specify a major version when you use the unpkg CDN. If you don't, then your app could break when breaking changes are introduced to App SDK.
Initialize Haravan App SDK in your app
To keep your embedded apps secure, you need to specify the following configuration values, when intializing App SDK:
-
apiKey: The client ID provided for your application in the Partner Dashboard. -
shopOrigin: The domain of the specific shop that's embedding your app. This value is provided by Haravan as a URL query parameter that's appended to your application URL when your app is loaded inside the Haravan admin. -
embedded: If set to true, then App SDK detects when your app is loaded outside of the Haravan admin, and automatically redirects the user to the Haravan admin page that embeds your app.
- Modular JavaScript
- CDN-hosted
import createApp from '@haravan/app-sdk';

const app = createApp({
  apiKey: 'YOUR_APP_CLIENT_ID',
  shopOrigin: "example-dev.myharavan.com",
  embedded: true
});
var AppSDK = window['app-sdk'];
var createApp = AppSDK.createApp;
var app = createApp({
  apiKey: 'YOUR_APP_CLIENT_ID',
  shopOrigin: "example-dev.myharavan.com",
  embedded: true
});
You should re-use the same App SDK instance because the shopOrigin parameter is only guaranteed on initial load of your app.
If your app isn't a single-page application, then your server needs to persist the shopOrigin value during the initial page load. On subsequent page loads, you should use the persisted shopOrigin value to configure App SDK.
Authentication flow using a session token
A session token, also known as a JWT (JSON web token), lets your app authenticate the requests that it makes between the client side and your app's backend. It also contains information about the merchant who's logged in to the Haravan admin.
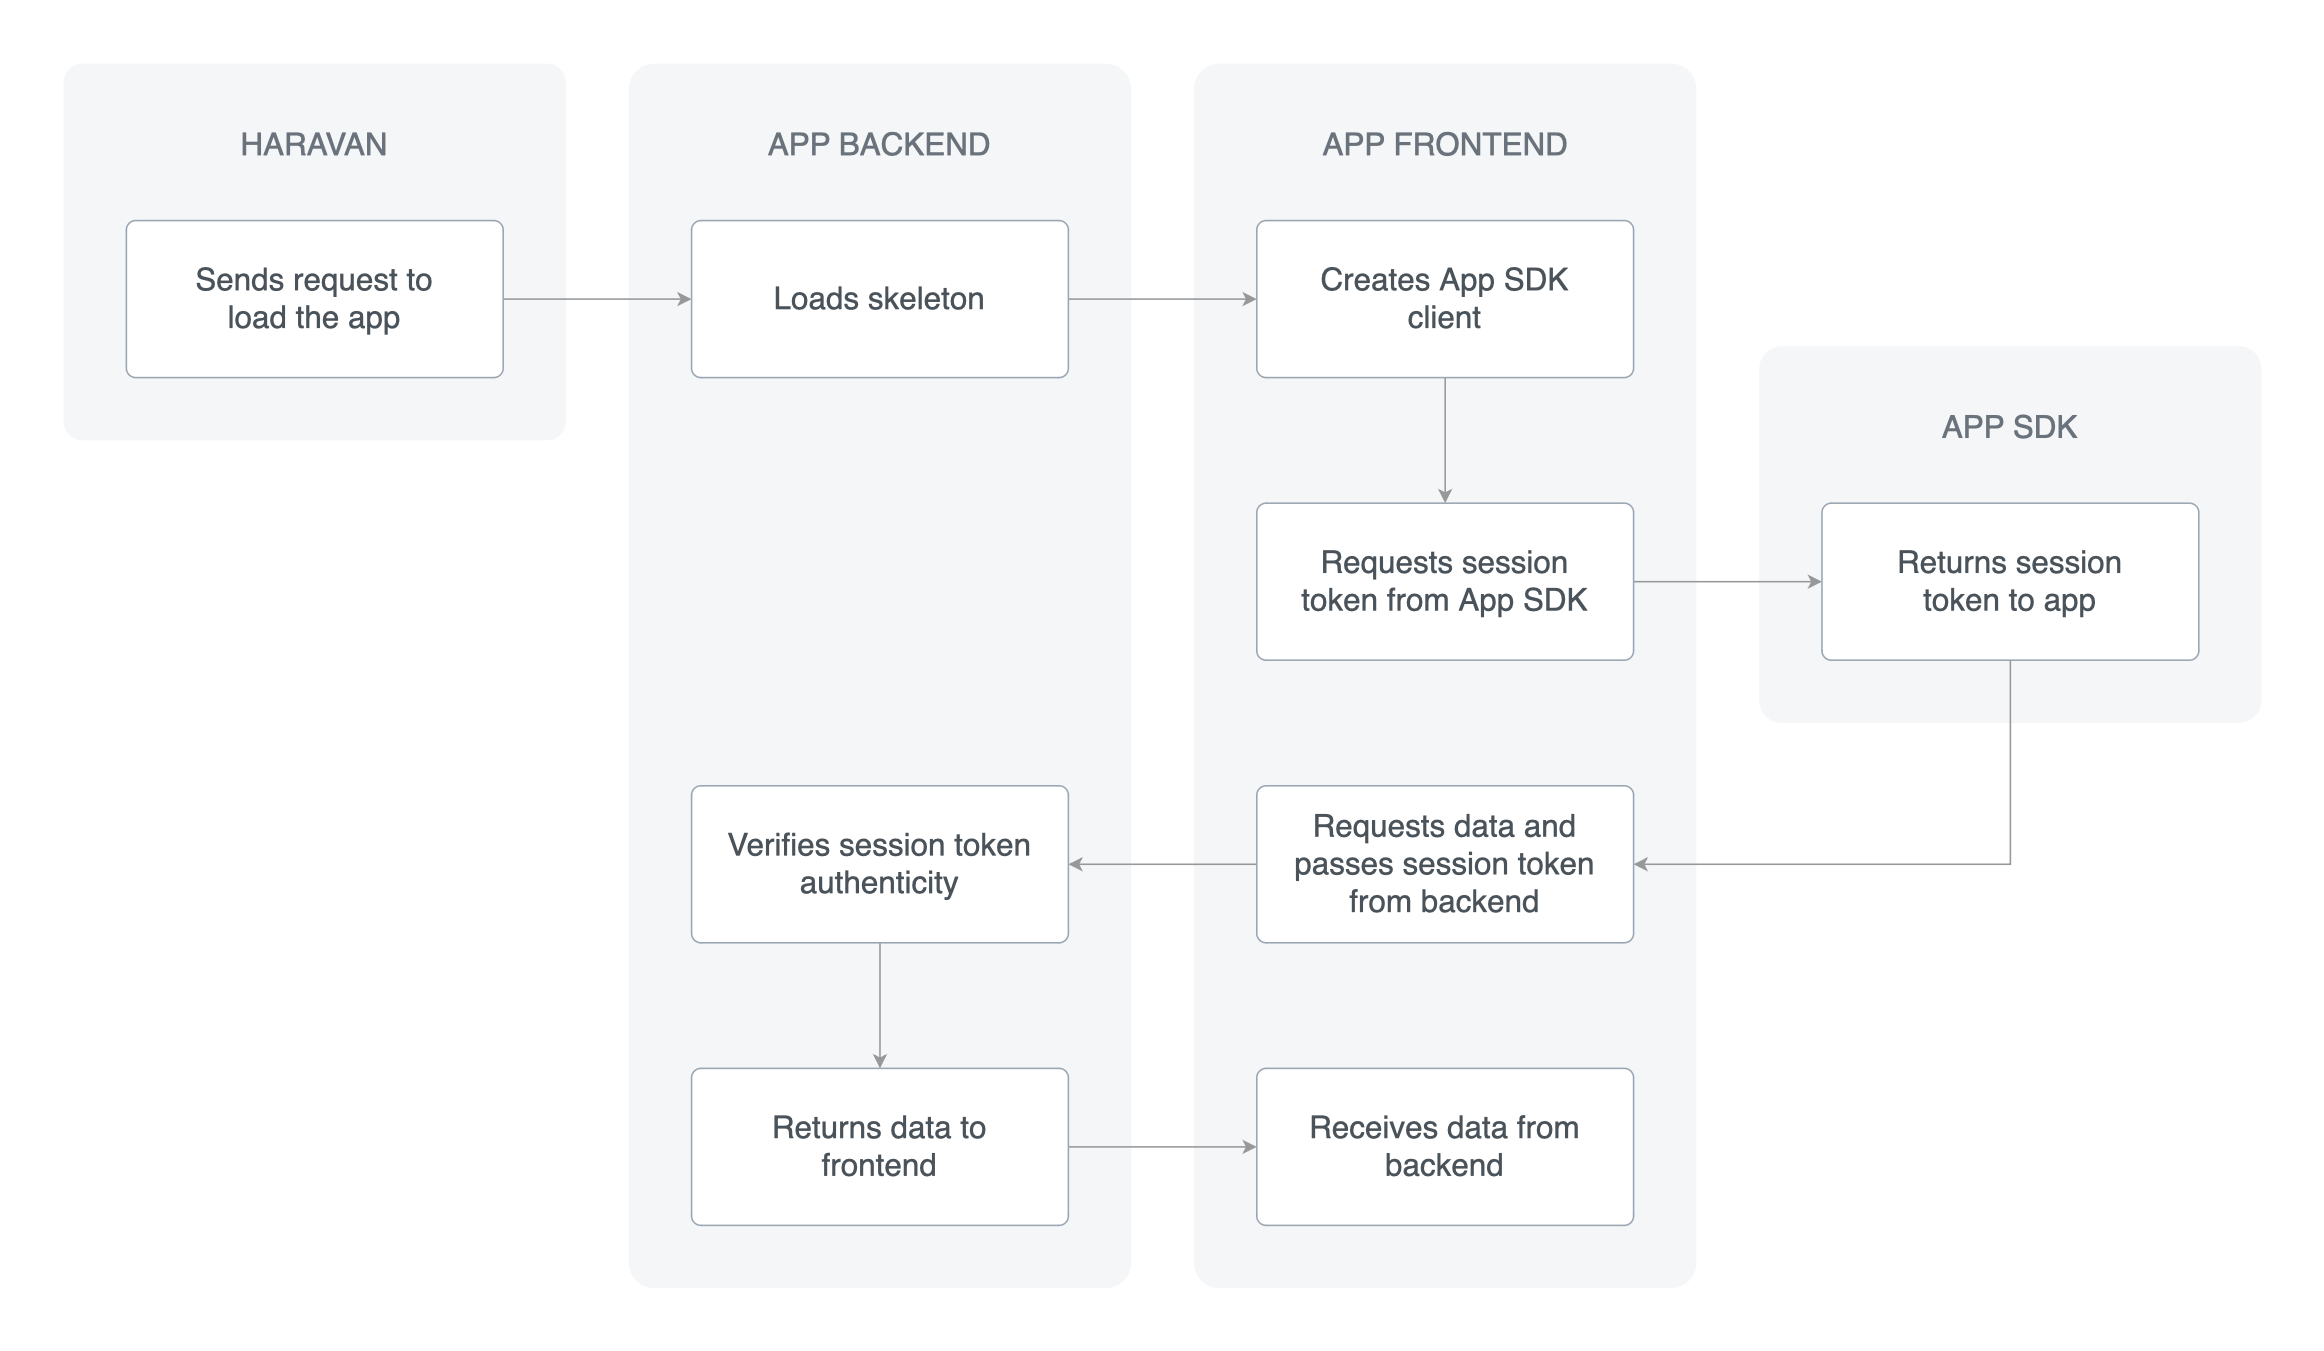
When your embedded app first loads, it's unauthenticated and serves up the frontend code for your app. Your app renders a user interface skeleton or loading screen to the user.
After the frontend code has loaded, your app calls a Haravan App SDK action to get the session token. Your app includes the session token in an authorization header when it makes any HTTPS requests to its backend.
- Modular JavaScript
- CDN-hosted
import {createApp, actions} from '@haravan/app-sdk';
var SessionToken = actions.SessionToken;

const app = createApp({
  apiKey: 'YOUR_APP_CLIENT_ID',
  shopOrigin: "example-dev.myharavan.com",
  embedded: true
});

SessionToken.getSessionToken(app)
    .then(newToken => console.log(newToken))
    .catch(err => {
        if(actions.Error.Action.FAILED_AUTHENTICATION === err.type){
            console.log(err.type);
            //should redirect to redirectAdminUrl
        }
        if(actions.Error.Action.NOT_FOUND === err.type){
            console.log(err.type);
            //should redirect to installUrl
        }
        console.log(err);
    });
var AppSDK = window['app-sdk'];
var createApp = AppSDK.createApp;
var actions = AppSDK.actions;
var app = createApp({
  apiKey: 'YOUR_APP_CLIENT_ID',
  shopOrigin: "example-dev.myharavan.com",
  embedded: true
});

actions.SessionToken.getSessionToken(app)
    .then(newToken => console.log(newToken))
    .catch(err => {
        if(actions.Error.Action.FAILED_AUTHENTICATION === err.type){
            console.log(err.type);
            //should redirect to redirectAdminUrl
        }
        if(actions.Error.Action.NOT_FOUND === err.type){
            console.log(err.type);
            //should redirect to installUrl
        }
        console.log(err);
    });
In App backend, you need to add middleware that detects requests with a session token present, verifies that the session token's signature is correct, and then builds a session based on the shop and user information included in the token.
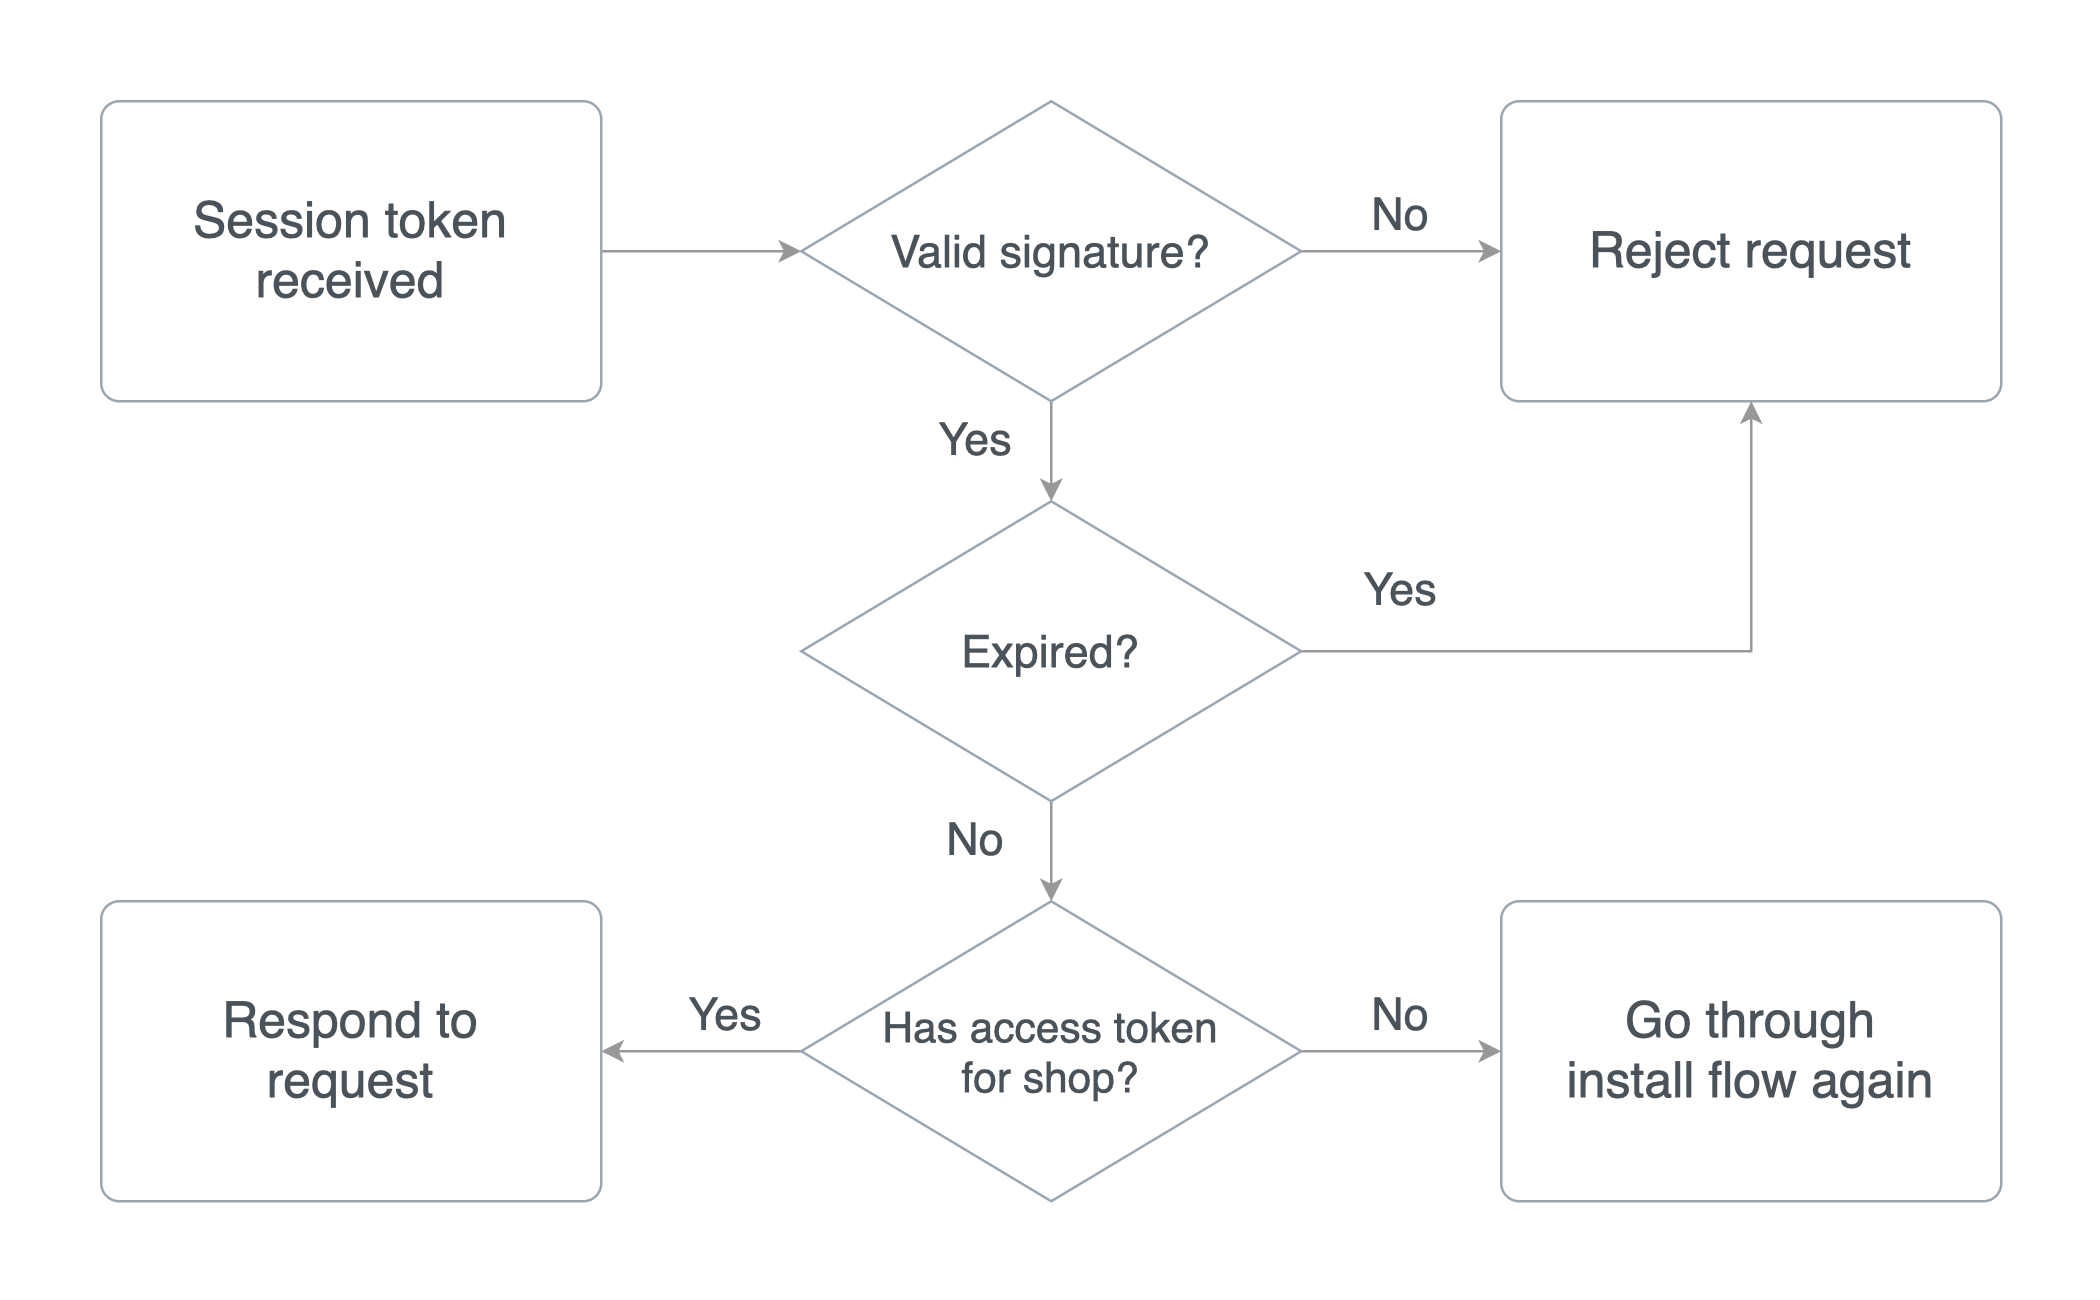
The lifetime of a session token is one minute. Session tokens must be fetched using Haravan App SDK on each request to make sure that stale tokens aren't used.
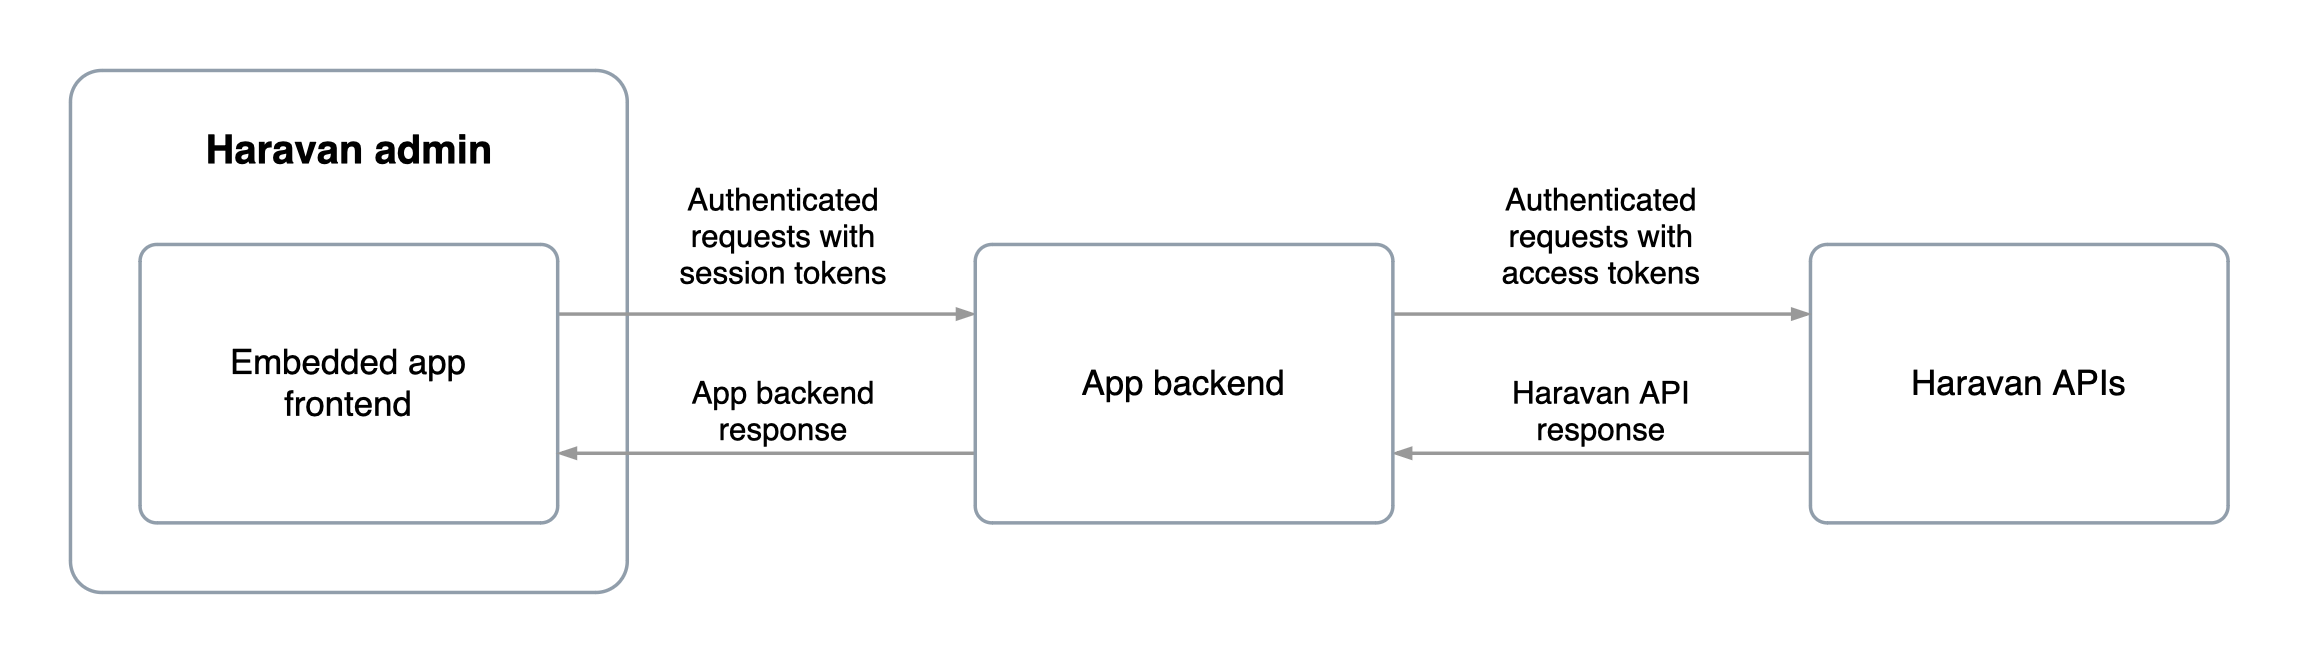
Session tokens can't be used to make authenticated requests to Haravan APIs. An API access token is what you use to send requests from your app's backend to Haravan so that you can fetch specific data from the user's shop.
For example, to make authenticated requests to the Admin API, your app must store the access token it receives during the install flow. To contrast, session tokens are used by your app's backend to verify the embedded request coming from your app's frontend.
The following diagram shows the authentication process using session tokens and API access tokens:
Actions redirect for Installation app
The Redirect action set allows you to modify the top-level browser URL. Use the Redirect action set to navigate within your app, or to redirect merchants else where within the Haravan admin , or redirect to accounts.haravan.com for Installation App.
- Modular JavaScript
import {createApp, actions} from '@haravan/app-sdk';
const Redirect = actions.Redirect;

const app = createApp({
  apiKey: 'YOUR_APP_CLIENT_ID',
  shopOrigin: "example-dev.myharavan.com",
  embedded: true
});
const redirect = Redirect.create(app);

//Redirect to Installation app
let installUrl = "https://accounts.haravan.com/connect/authorize?response_mode=query&response_type=code&scope=openid org profile userinfo com.write_products com.read_products grant_service&client_id=YOUR_APP_CLIENT_ID&redirect_uri=http://localhost:3000/callback";
redirect.dispatch(Redirect.Action.REMOTE, installUrl);
Next steps
Now that you've initialized your app, you can use any Haravan App SDK actions.
- The redirect action set allows you to modify the top-level browser URL.
- The toast action set displays a non-disruptive message that appears at the bottom of the interface to provide quick and short feedback on the outcome of an action.
- The loading action set is used to indicate to merchants that a page is loading or an upload is processing.
- The SessionToken return a Promise of session token used by Embedded Authorization
- The History action set allows you to use the JavaScript History API to modify the top-level browser URL without navigating.
- The Fullscreen action hides Haravan UI and expands the application iframe to cover the entirety of the browser window. This gives applications the ability to implement complex workflows such as editing workflows, immersive experiences, or previews.
- The contextual save bar is used to indicate that a form on the current page contains unsaved information, or when the merchant is in the process of creating a new object, such as a product or customer. The contextual save bar provides save and discard buttons to a merchant.